-")

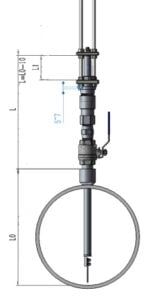
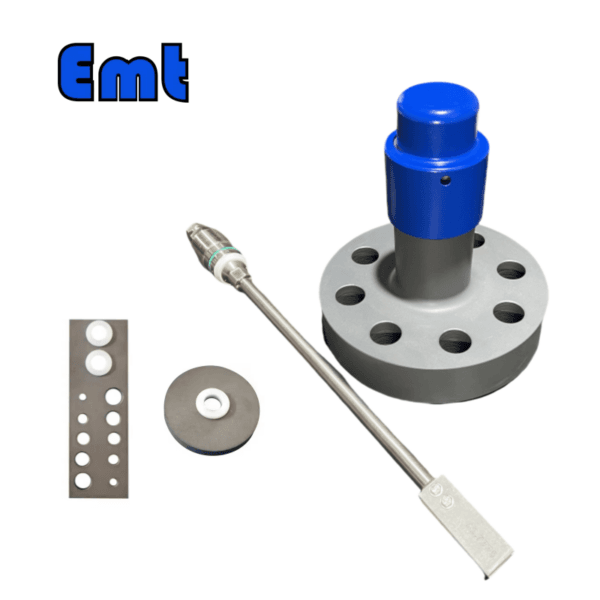
(Figure one)
For pipelines designed with pressures under 10 MPa, the EMT-RCC Adjustable Corrosion Coupons system features a dedicated clamp-style tool for easy dismantling. The EMT-RCC Retractable Corrosion Coupon System is versatile, handling pressures up to 1500 psi (10.3 MPa) and temperatures up to 500℉/260℃, ensuring effectiveness in challenging pipeline conditions. Adjust the depth of the corrosion coupon probe installation based on pipeline diameter and wall thickness, offering flexibility across different pipeline sizes. Standard system lengths range from 24 to 48 inches, therefore catering to various pipeline diameters, with provision for an insulated strip-type corrosion coupon at the system’s end. The system includes essential components like a probe rod, ball valve, corrosion coupon, and adjustable safety clamp kit, recommended for pipelines below 1500 psi and 500℉ to ensure operational safety.
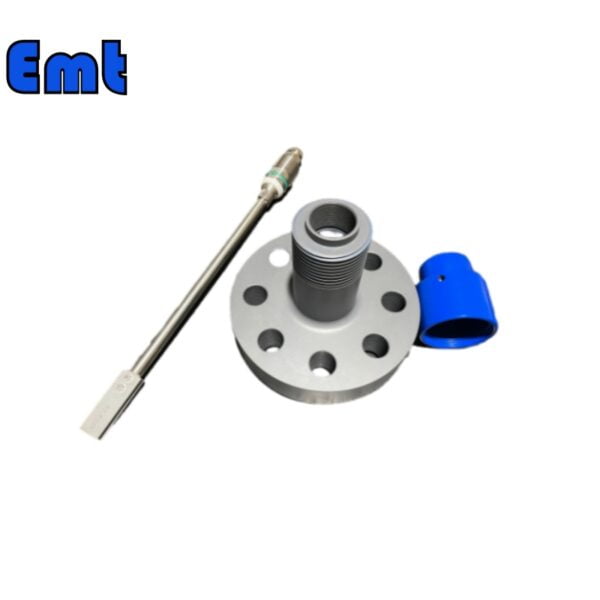
(Figure 2)
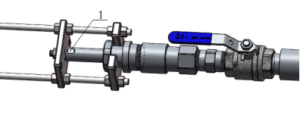
Initial Installation of EMT-RCC Adjustable Corrosion Coupons
When the product leaves the factory, it arrives fully assembled, including the welded base and having undergone a pressure test. For installation, users need to detach the welded base from the valve connection, weld it onto the designated pipe spot (pre-drilled φ27~30mm diameter), measure distance L0 as depicted in Figure 2, adjust safety clamp spacing L1 (as shown in Figure 2), mount the corrosion coupon system on the base, adjust distance L and coupon direction, and secure the upper and lower safety clamps. Once these steps are completed, the installation is finished.
Here are the detailed steps:
(1) Pre-Installation Preparation
Drill a hole about φ27 to 30 mm wide at the intended pipe location. Then smooth any rough edges or debris post-drilling and clean off any rust where welding will occur.
(2) Separating the Welded Base
Detach the welded base from the corrosion coupon system at the junction between the welded base and the valve (between items 5 and 6 in Figure 1). Use one wrench to secure the valve body and another to unscrew the welded base.
(3) Welding the Welded Base (Item 6 in Figure 1)
Align the welded base with the drilled hole (perpendicular to the pipe center and wall, and concentric with the hole), then weld it securely.
(4) Determining Installation Distance L
After welding the base, measure the maximum distance from the top of the welded base to the inside of the pipe. Use a probe rod for this or measure directly, ensuring the probe rod is perpendicular to the pipe’s center and inside wall. This is distance L0 in Figure 2. Calculate the positioning distance, L, by subtracting 10 mm from L0, i.e., L = L0 – 10 mm. Keep a record of this positioning distance for future reference during coupon installation and maintenance.
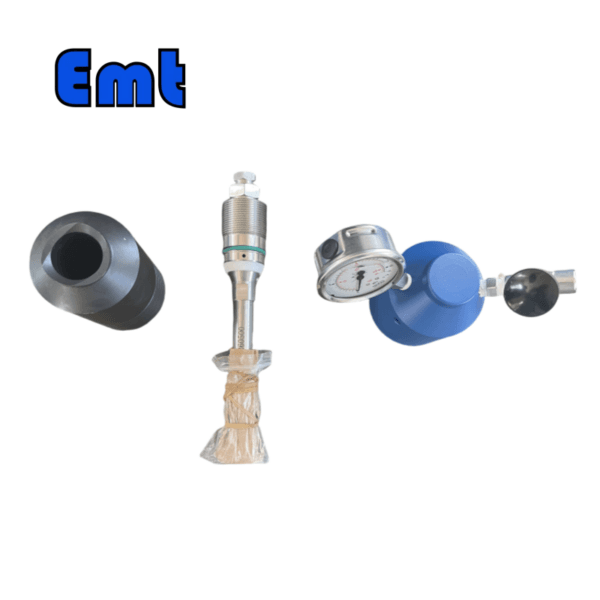
(Figure 3)
(Figure 4)
Disassembly and Maintenance Inspection
When disassembling the Corrosion Coupons system for maintenance inspection, follow these steps:
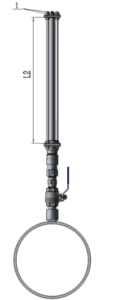
(1) Adjust the Upper Safety Clamp
Position the upper safety clamp with the valve closed.
Loosen the two nuts on the upper safety clamp. Adjust them to distance L2 (515~525mm) as shown in Figure 4. Stop once adjusted.
If there is pressure inside the pipe, the corrosion probe support rod should rise as the nuts are loosened. Then check for any jams to prevent sudden bursts under pressure.
Note: Two people can loosen the nuts together, or one person can alternate unscrewing them every 1 to 2 turns.
Ensure the corrosion coupon support rod pops out as the nuts are loosened under pipe pressure. Address any issues promptly for safe operation.
(2) Shut the Valve
Turn the valve handle to the closed position.
Note: Confirm distance L2 (515~525mm) before closing to prevent damage to internal parts due to incorrect positioning.
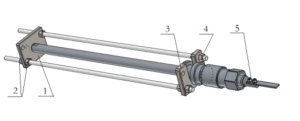
(3) Remove the Sealing Nut
Secure the branch pipe (No. 4 in Figure 1) atop the valve with a wrench. Turn the sealing nut counterclockwise with another wrench. Once loose, separate it by hand along with the parts above and store them safely.
(Note: This step requires two people.)
With this, the coupon system can be detached from the welded base and pipe, completing the disassembly process.
(4) Disassemble the Corrosion Coupon
To disassemble the corrosion coupon, adjust the nuts on the upper safety clamp to reduce the distance between the clamps until the coupon and fixing nuts fully extend out of the sealing nut. Refer to Figure 5 for guidance.
Unscrew the fixing nuts, remove the corrosion coupon, and proceed with necessary inspections or replacements.
- Upper Safety Clamp
- Adjustment Nut
- Lower Safety Clamp
- Locking Nut (locked during adjustment)
- Corrosion coupon fixing nut
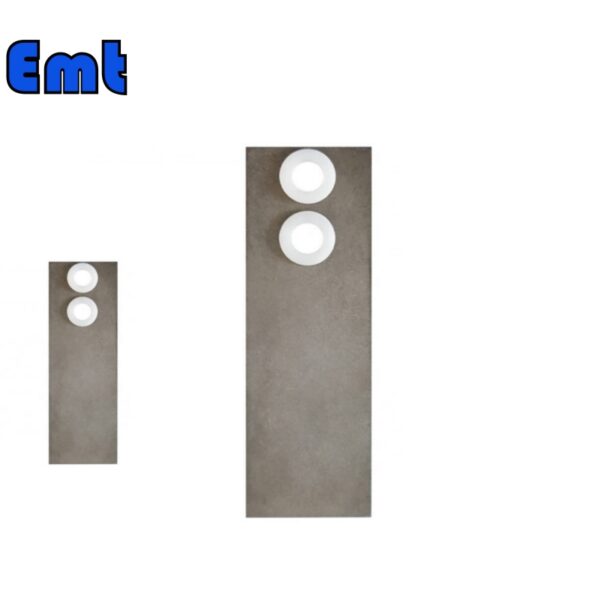
(Figure 5)
Parameters
| Shape | strip |
| Dimensions | 3″ x 1/2″ x 1/16″ (7.6 cm x 1.3 cm x 0.16 cm) |
| Installation hole | 2 holes |
| surface area | 3.4 in² (21.9 cm²) |
Selection Model of EMT Corrosion Coupons
| Model | |||||||||||||
| CC | Corrosion Coupons | ||||||||||||
| -Code | Plug Body Assembly | ||||||||||||
| Pxxx | Type | Material | Sealing Material | ||||||||||
| 0 | No Request | 0 | CS | 0 | No Request | ||||||||
| 1 | Hollow Plug Body | 1 | 316SS | 1 | Viton O-Ring / PTFE Primary Packing | ||||||||
| 2 | Solid Plug Body | 2 | 316LSS | 2 | HNBR | ||||||||
| 3 | DUPLEX SS | ||||||||||||
| 4 | INCONEL | ||||||||||||
| Type of Coupon Holder | |||||||||||||
| SR | Fixed Coupon Holder for assembling rectangular coupon | ||||||||||||
| AR | Adjustable Coupon Holder for assembling rectangular coupon | ||||||||||||
| LR | Ladder Coupon Holder for assembling rectangular coupon | ||||||||||||
| SC | Fixed Coupon Holder for assembling circular coupon | ||||||||||||
| AC | Adjustable Coupon Holder for assembling circular coupon | ||||||||||||
| -Pipe Size | |||||||||||||
| x | Pipe Size in inch | ||||||||||||
| – Coupon Size | |||||||||||||
| A×B×C | Coupon Size in inch or mm | ||||||||||||
| – Coupon Material | |||||||||||||
| x | Grade | ||||||||||||
| -Finishing of Coupon | |||||||||||||
| 0 | Mill | ||||||||||||
| 1 | Glass Bead | ||||||||||||
| – Isolation Gasket | |||||||||||||
| 0 | No Gasket | ||||||||||||
| 1 | Nylon Gasket | ||||||||||||
| 2 | PTFE Gasket | ||||||||||||
| For Example CC-P221-SR-6″-3″×1/2″×1/8″-MS1018-0-2 CC: Corrosion Coupon | |||||||||||||
| P221: Solid Plug Body in 316LSS Viton O-Ring and PTFE Primary Packing | |||||||||||||
| SR-6″:Fixed Coupon Holder for assembling rectangular coupons and for 6″pipe | |||||||||||||
| 3″×1/2″×1/8″: Coupon Size MS1018: Coupon Material | |||||||||||||
| 0: Finishing of Coupon is Mill 2: Material of Isolation Gasket is PTFE | |||||||||||||
There are no reviews yet.